First up is the standard version:-


Some trimming on the front and back pieces was required to get all the edges flush and leave a space for the struts to be attached. The symbols had to be cut with a modelling knife as they were too small even for my mini scissors.
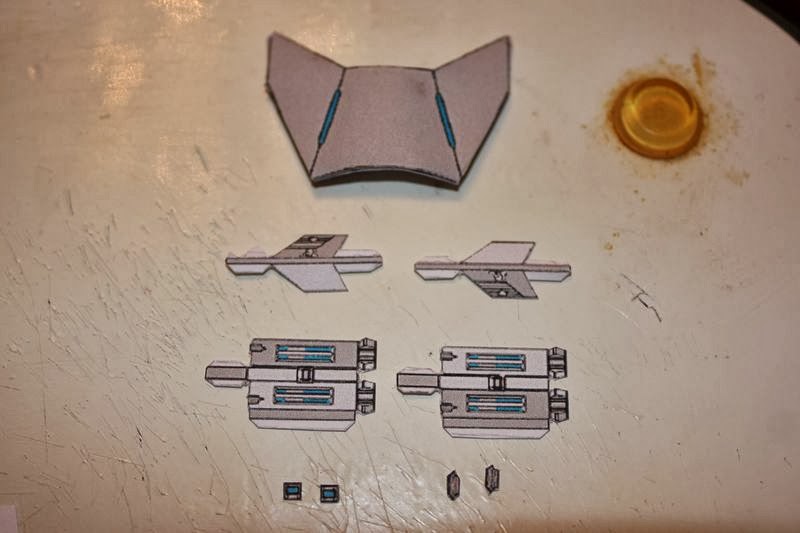
The nacelles went together slightly asymmetrically, but in my opinion
this looks quite good when they are attached to the struts. I know that
I've placed the smaller pieces in the wrong position - the reference I
had available was a similar model which had some very obvious mistakes
on it - I placed the squares at the front and used the irregular
shaped pieces to form the rear of the nacelles, but I realise that the
irregular shaped parts should be folded around the front. This will be
remedied in the layered version.


I used a cocktail stick to curve the neck and trimmed the side struts to get them flush with the front of the wing structure.

This is where I hit a big snag. The command module required a lot of reworking -
when I had put it together it was twice the size necessary for the rest
of the bridge. I had to savagely trim the back and remove large chunks
from the top to get it in proportion to the rest of the ship and give it
a shape I was satisfied with. It might have been a better idea to
remove the tabs and join the bulb pieces with strips of paper glued to
the inside, but I did eventually achieve a size and shape which I'm happy with.
It's not shown in the next photo, but it will be when both
builds are photographed mounted and side by side.

At the end I was left with a handful of pieces which I have no idea of
where to put and a few others which I felt were redundant at this scale. So now I
have a nice teeny, toty, wee D7 measuring approximately 2" long.
Next up is my rework with some layers, again starting with the wings.

I had a setback at this stage in the form of a big, daft pup. My cutting board
was on the receiving end of his excitement and the first build ended up
like a victim of the Doomsday Machine! I had a dozen pieces laid out
ready for gluing and they got scattered along with my offcuts, so
everything finished up as just so much confetti - lol. A bit of surgery
with a modelling knife and a cocktail stick almost repaired D7 no.1, but
sifting through the confetti didn't produce any of the smaller pieces I
had ready and I had to cut some more. It's just as well that I printed
the design seven times! Eventually I was back at this stage:-

For the port strut I removed the striped part on the outer layer and
retained the original parts for the central and back pieces. The result
can be seen on the glued starboard strut.This produced struts slightly
thinner than version 1, but still with good proportions. For the outer
layers of the nacelles I removed blue central strips and made the ends
smaller to give a bevelled effect. I found that four layers wouldn't be
thick enough and cut another central layer on each nacelle. With the
five layers joined the wrap-round pieces were added - blue square
vertically on the rear, white square on the bottom and pie-shaped piece
in the outlines on the front. The results will be shown properly in the
finishing comparison pics. That done it was time for 'the box' on the
wings (?impulse engine?):-

The main box was composed of seven graduated layers to give a
profile flush with the end piece. Three layers was sufficient for the
outer structures and I used the original piece for the front.
With 'the box' complete I moved on to the neck and upper bridge:-

I've retained the original neck as layering would end up looking like a
dog's dinner. Three layers of gradually decreasing size were used for
the section on top of the rear of the neck, and I decided that three
would be OK for the side struts. Six layers gave a good depth for the
bridge superstructure and four was sufficient for the rhombus. I added
the piece to the right on top of the rhombus. After checking Ex Astris
Scientia I saw that the top of the bridge appeared to be elliptical so I
cut three layers of gradually decreasing size for this then added a
fourth smaller layer (not shown in the photo) to the bottom of this
section. The two orangey dots were only slightly smaller than a pinhead
and I used the moistened tip of a cocktail stick to place them atop the
ellipse. The two blue rectangles were attached to the sides of the
superstructure and required a tiny trim after they were attached. I also
decided to add a window section from the command module strip to the
front (after checking the orthographics) and finally attached the piece
that looks like a grain silo:-

Now for the dreaded command module! This time I didn't use tabs or build the bulb before attaching it:-

With the first strip attached to the superstructure I glued three
very thin strips of paper to the inside to replace the tabs I used in
version 1. Working from the front paper strip the command module pieces
were then trimmed to the appropriate length before being glued directly
to the neck - it's more time consuming, but I could work on the mounts
while I was waiting for the glue to dry. I ran a fingernail along the
inside of the module strips to get the desired curvature. The two blurry
blue dots were glued to the underside of the superstructure and here are the finished models:-

Paper would be better for the torpedo launcher, but I wasn't going to print out a sheet of A4 just for one tiny part ;-)

Aye, I know version 1 has a bent neck - remember The Doomsday Machine, ie my daft big puppy dog! lol

This shows the extra detail that can be produced with layering. At this scale I think it's particularly effective.

And finally - "Are you looking at me?!? Today is a good day to die!" ;-)
No comments:
Post a Comment