FEDERATION:-
Akira x3
Centaur - USS Centaur NCC 42043
Defiant - USS Defiant NX 74205
Excelsior x4 possibly with both variants
Federation Attack Fighter x7
Galaxy x5
Jupp - USS Jupp
Miranda x7 possibly with two variants
Sabre x2
Steamrunner x2
KLINGON:-
Bird of Prey x5
Vor'Cha x3
CARDASSIAN:-
Galor x25
Hideki x15
JEM'HADAR:-
Cruiser x10
Fighter x30
This isn't carved in stone though, and I might drop the numbers the closer I get to being an OAP!
I'm starting with the model which is conspicuous by it's absence in my list: DS9. I'm using Ninjatoes' design and since the scale was given as 1:5000 I shrunk it to 63%. Unfortunately this gave me a space station 4" in diameter and I had to reprint the whole bloody lot at the original size. This was a bit of a pain as I'd double printed the design so that I could add some insets and protrusions. From now I'll be comparing the resized designs with a comparison chart cobbled together from L-Cars rather than trusting my calculations
 .
It might take longer to get the size right by trial and error, but it's
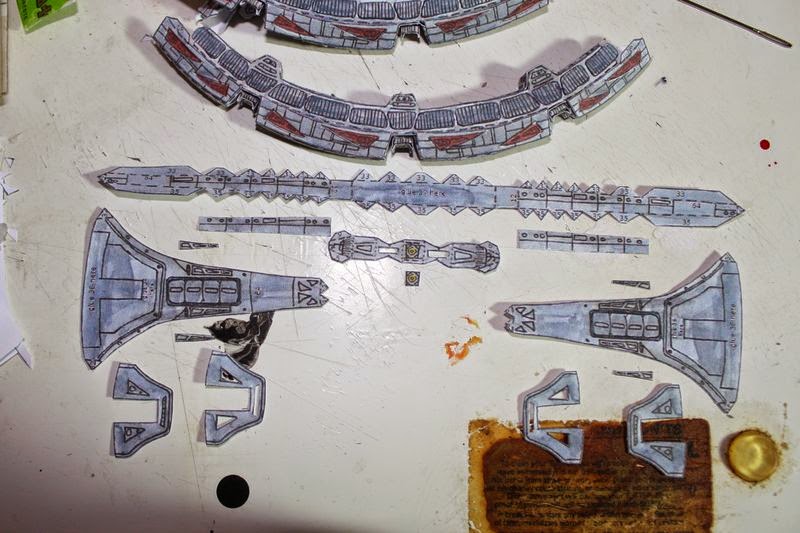
safer than just bulldozing ahead with printouts. Anyhoo, I cut the
parts for the outer rim of the ring first:-
.
It might take longer to get the size right by trial and error, but it's
safer than just bulldozing ahead with printouts. Anyhoo, I cut the
parts for the outer rim of the ring first:-
I've only shown one section; this has to be built three times. The
diamonds with the red dots also had to be removed before those parts
were connected. I then cut the parts for the upper surfaces of the ring
and used my extra printout for insets and layers:-

Again, this has to be done three times.
I've caught up with all the thirds of the ring, joined all the upper parts and cut the pieces for the lower half of the ring:-

I've caught up with all the thirds of the ring, joined all the upper parts and cut the pieces for the lower half of the ring:-
I'm making a lot of extra work for myself, but even the addition of one
more layer makes a world of difference and is well worth the effort.
Keeping up with the slow, steady approach I built the lower halves of the ring and cut the pieces for it's inner face:-

I connected the sections of the outer cargo ring and cut the parts for the runabout docking bays:-

then, once the runabout docking bay arms were built, I joined everything
together to form the outer ring. When this was done I cut the parts for
the pylon bases:-
The parts for the pylon bases were duplicated six times - leading to a wee bit of repetitive strain with cutting the insets - lol.
On reflection, it would've been better to have recessed the runabout
docking bays, but that would've meant printing page 1 another three
times so I didn't bother. With the pylon supports built, I cut the parts for the pylons themselves x6:-

The lower pylons are in place and the upper pylons are waiting to join them:-

It's starting to be recognisable as DS9 (Terok Nor) now.
I'm now onto the inner ring, starting with the top:-


I'm now onto the inner ring, starting with the top:-
Although there are wee differences between Ninjatoes' design and the
studio model I'm able to remain quite faithful to the original DS9 by
being pedantic with my layers. OCD? Me?!? Nah...
I joined the layers to the ring then cut the parts for the outer rim.
This took around two hours as I'm actually using the tabs provided for a
change:-
With the rim and it's protrusions attached, I cut the parts for the inside and bottom faces of the inner ring:-

It's hard to believe that I've already been at this for over a week!
The main body of the inner ring was attached:-
 and I cut the parts for the weapons sails x3:-
The main body of the inner ring was attached:-
I've found some minor problems with alignment of parts up to now. The
weapons sails posed a bigger problem though. The rim just wouldn't line
up properly with the sides so I did the best I could and then trimmed
the hell out of the overlaps. The access corridors were less
problematic, but there was still a bit of an overlap; nothing a pair of
scissors couldn't handle.
Due to the extra layers I had to remove the tabs from the sails and
make the slot a wee bit bigger to get it over the ring. With the sails
and corridors attached we get this:-


The next stage was the upper portion of the central column, ie ops:-
followed by the promenade:-
which only leaves the reactor still to be built.
The promenade was attached and I cut the parts for the reactor plus a few strips for detailing on the promenade:-


The promenade was attached and I cut the parts for the reactor plus a few strips for detailing on the promenade:-
This gave a central column which looks like this:-
The small cylinders around the circumference weren't long enough to
reach the dots marked on the parts and I had to move them inwards a wee
bit to make a connection. If I had to do it again I would remove the
tabs on the cones to shorten the gap. It was a bit of a squeeze to get
the column into it's final position so it's a lovely, tight fit. The
result is:-
I seriously considered putting LEDs inside for the reactor and for all
the windows. Unfortunately, there would be too much leakage where there
were alignment problems and I thought that masking the insides would be
just too much bother than it was worth. Adding a lining would also make
it really hard to find room for the bulbs.
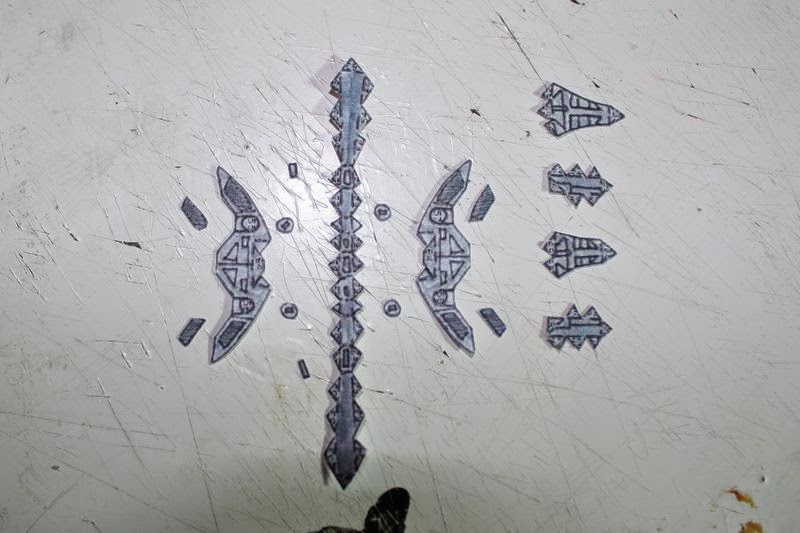
I've made a start on the three Akira class ships. The saucer is only 1"
across so it wasn't worth the effort of adding names and registry
numbers - they're unreadable at this size.
I joined all the central support parts then cut the rims and some contouring pieces:-

Since the rim pieces are under 1mm thick I'm having to use the moistened point of a toothpick to ease them into place.
With the contouring parts attached, it was time to cut the pieces for the underside of the saucer and the deflector dish mount:-

I'll need to invent a new word for this - "fiddly" doesn't come close! I
used very thin paper strips to connect the rear curves then curled
everything round a toothpick. The housing for the deflector dish
required something smaller so I used a darning needle to shape it. First
I tried connecting one side of strips to the deflector panel - don't
try this at home kids! It was a stunning failure  .
Instead I found that connecting both ends of a single strip, working
from the smallest to the largest, gives a much better result.
Fortunately I'll be blowing the crap out of one of these so it doesn't
matter too much if one turns out looking like a dog's dinner...
.
Instead I found that connecting both ends of a single strip, working
from the smallest to the largest, gives a much better result.
Fortunately I'll be blowing the crap out of one of these so it doesn't
matter too much if one turns out looking like a dog's dinner...
The undersides of all three ships fitted really well! I really expected one of them to be a total mess, but the gap was reduced when it was attached. The next stage was adding the contouring sections and bridge to the upper half of the hull:-


.
Instead I found that connecting both ends of a single strip, working
from the smallest to the largest, gives a much better result.
Fortunately I'll be blowing the crap out of one of these so it doesn't
matter too much if one turns out looking like a dog's dinner...The undersides of all three ships fitted really well! I really expected one of them to be a total mess, but the gap was reduced when it was attached. The next stage was adding the contouring sections and bridge to the upper half of the hull:-
I used the blunted end of a toothpick to shape the lower section of the
bridge, and the other, not so blunt, end for the miniscule upper piece.
With these connected I cut the parts for the nacelle struts and weapons
pod:-
I've omitted a few of the thinner edging pieces here 'n' there as they're kinda redundant at this size.
I ditched the edges on the nacelle struts - they made 'big', chunky
boxes which were totally out of proportion at this scale. Instead I just
stuck the opposite faces to each other for a double thickness. That
just leaves the nacelles to be built and attached:-

I thought that the bussard collectors would be really hard to build this
size, but they were surprisingly easy. As always the cutting had to be
precise - tiny mistakes translate into metres when the camera zooms in. I connected the nacelles and then noticed a wee pile of parts I'd forgotten about:-


With those pieces attached I have three Akiras at just over 1 1/2" (40mm) in length:-
The bulb on the underside (which
contains the deflector) seems a bit deep, but I can always squash it a
wee bit if I get too bothered by this.
No comments:
Post a Comment