Monday, 14 April 2014

Star Trek TOS:- "The Trouble With Tribbles" K-7 Diorama - micro build log

   I'm going to skip the blow-by-blow account of the building of the USS Enterprise and the Gr'Oth - build logs for Constitution and D7 class ships are presented in other posts.Once again I'm using Glen Jupp's version of the Enterprise and I'm using Spaceagent-9's design for the Gr'Oth. The design for Deep Space K-7 that I settled on is D-Whale's. The instructions are very comprehensive and it's been a straightforward build so far. My thanks to all three designers.
    Starting with the upper module of the central column, the parts are as shown:- 
   I didn't have a great deal of contrast between the shade of the disc and the shade of card I was printing on, so I had to do a lot of re-trimming and dry-fitting to achieve a good fit. I also omitted the three small, internal supports as they're not really necessary at my scale.
    Continuing to build the upper module required these additional parts:-
   The dome on the bottom of the cylinder at the side was particularly intricate, but the blunt end of my modelling knife provided a perfect base for shaping these tiny pieces.
    The next stage is the lower module of the central column:-
   I've been building the Gr'Oth while waiting for glue to dry on the station - I've built so many D7s now that I can practically do it blindfolded. I'm also going to use a previously built Enterprise since I now have three at this scale! 
   The cone on top of the central column and the arms for the other three modules came next:-
   These were wrapped around a needle to curve them into tubes - even a cocktail stick was far too big! I then started on the outer modules:-
   This is probably the lower limit of the size I could build the station - the tips of the cones were just able to be wrapped around the point of a cocktail stick. More module parts then had to be cut:-
   Koloth's (aka The Squire of Gothos) ship is also coming along nicely. 
   Put everything together and the result is a Deep Space K-7 measuring 2 1/2" (63mm) in width:-
   I've shown close-ups of the Enterprise elsewhere, so here's a close-up of the Gr'Oth:-
   I cut up a cardboard box and pasted a starscape to an edge. I then curved one of the sides and pasted some more starscape (with a planet!) to the curve. The space station was mounted (fairly) centrally with the Enterprise and Gr'Oth circling on opposite sides. There are no lights this time I'm afraid - there just isn't room inside K-7 and the amount of fibre optics needed would make it look like a demented jellyfish!
The Trouble With Tribbles.

Saturday, 5 April 2014

Star Trek IV: The Voyage Home:- "Delivering Humpbacks" Diorama - micro build log

   I thought about having the cetacean probe overhead in this diorama, but it's length was estimated to be 17km - that would make it 8.5m long even at my scale! I found Golden Gate Bridge plans on skyscraper.com and I've started on them. I considered cutting round the girders for all of 2 seconds - I would be drawing my pension before I finished that. The two supports will be 4" high giving a total length of around 0.75m. I'll be using spaceagent-9's Klingon bird of prey for the Bounty. I was thinking that I would need a couple of 5mm humpbacks until I remembered that George and Gracie weren't released until the Bounty crashed in the bay. So this will be a long, thin diorama of the HMS Bounty swooping under the central span of the Golden Gate Bridge. It starts like this:-
and continues like this:-
   An aerial photo of the sea stretched across 3 sheets of A4 paper should give enough length, and I have an empty champagne bottle box to mount it on (parents' Golden Wedding Anniversary).
   This is the main structure, mounted and awaiting the addition of suspension cables:-
   To keep things interesting I've also started working on spaceagent-9's bop:-
   If I was a glutton for punishment I could also simultaneously build the probe, but I need to work out a few logistical details before that ;-).
    Work on the bridge is painfully slow. I have a guide to position everything and I'm using tape to keep the wire and thread roughly in position. Each thread has to be tied off individually and secured with a dab of PVA. Once the top is dry the bottom also has to be secured with PVA. So far I'm about half way along the first side:-
    It's also excruciatingly boring so here's some more of the bop:-
   Thankfully spaceagent-9 has posted a build log for this on Zealot and I'm taking advantage of that.
   I'll be fitting two insulated LEDs inside this one - assuming that I can wrap the neck around the wiring - so the torpedo launcher and rear engine (and nothing else!) should be red-lit. 
   
I've finally finished one side of the bridge! There's a lot of extra wraparounds to hold it in place just now; they'll come off when I have the other side running parallel. I'm going to try attaching the thread directly to the other side. I thought that using wire for the upper cable would be a good idea, but if anyone decides to build one of these I would recommend using embroidery or darning thread instead. A suspension bridge needs weight to be suspended from it and the card road spans are nowhere near heavy enough to pull wire into the right shape. I would also recommend attaching the main support cable directly to the buttresses to avoid all the tangles that would inevitably be produced when moving a mass of threads.

   The bop is progressing nicely as well. Spaceagent-9's build log has been a huge help:-
   The second LED has still to be wired in - I had to disconnect everything and start again as the wires + tape were too thick to wrap the neck around. 
   I scrunched up the warp drive gubbins (another highly technical term) and glued them so that the wings are raised, leaving the other bits - guns and... I haven't a clue what they are - to be attached:-
   I then used a green pen on all the white join lines before attaching the guns/disruptors:-
   ​A final touch was the renaming to HMS Bounty:-
   Let there be light!
   I pretty much packed the body with garbage - offcuts of card and insulating tape - to cut down light spillage, and I'm really pleased with the result:D.
Now I need to find some texture for the probe and mibbe a soundbite - I'm sure I saw one somewhere... 

   I spent an hour building the probe. The most fiddly bit was the ball since I had to cut loads of tiny, tiny rhomboid bits of blue coloured card and stick them on a globe of blu tac:-
   I rolled a tube of card and cut a hole in it near the front before running some white thread through the ball and the top of the tube. I printed off some pics of the probe and stuck sections around the tube then inserted three clear LEDs in a card cone glued over the hole, and finally stuck another printed texture section across the front end - the back had to be left open to give access to the wiring. I suspended the finished probe from a standard lamp (just for the photo - it'll hang from the bottom of a shelf in my room) using black thread. The bop was placed on two wires pushed through the base, with the LED wiring forming a tripod for extra support.
   The bridge looks like it's in the middle of an earthquake, but I'm going to take poetic licence and say that that's the disruptive effect of the cetacean probe.

Wednesday, 2 April 2014

Star Trek: TOS:- "The Tholian Web" Diorama - micro build log

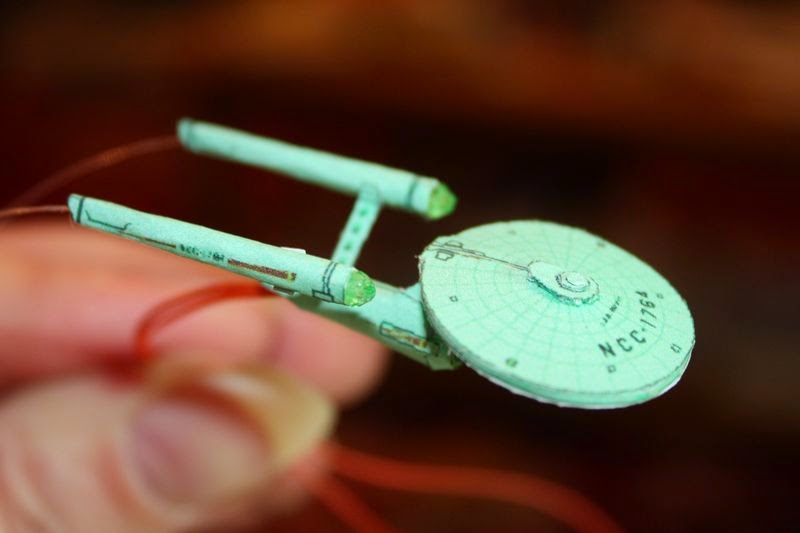
   Details and tips on the building of the USS Enterprise can be found in "The Enterprise Incident" thread - I'm way too lazy to go through it all again here ;-). The only real change is the swapping of Blu Tac for 2mm bicone red beads with 0.25mm fibre optic filament threaded through the nacelles:-
    I've used Glen Jupp's pattern for the USS Defiant with a green overlay put in place using a program called ImageJ:-
   Instead of using a disc of thick card to build the saucer, I've cut a thin strip of green card and glued it around the circumference. This ensures that there is sufficient internal space for a green LED which will hopefully penetrate the card and give a nice glow.
   For this one I used pale green beads for the bussard collectors and I've threaded filaments through them too. The almost finished Defiant looks like this:-
   The red wiring will be painted black, as will the fibre optics if they start glowing green outside the nacelles. If you thought that my previous efforts were small wait till ya get a load of this!
   The Tholian webspinners have a crew of teeny, toty wee Tholians the size of atoms - lol.
   Coming in at 4mm these are by far the smallest ships I've built. There's still a bit of touching up to do around the edges and then I'll start them spinning. It'll just be gold thread this time as I can't see any way of building up fibre optics that wouldn't be a totally nightmare! I used a circle of fairly thick card coloured black and glued thread at 10mm intervals horizontally. I then glued some more thread 10mm apart at an angle with gold thread at the back of the Tholians and black thread at the front:-
   The excess thread was trimmed before everything was mounted. It's not much to look at side-on - lol - but head-on it's not too shabby at all! The Enterprise is in the foreground with lit up bussard collectors:-
although the lights don't show up because of the camera flash! The Tholians are in the mid-ground with the disc mounted vertically:-
   The Defiant is mounted just in front of the starscape backdrop. I managed to fit a second LED inside the secondary hull so that a more even green glow was achieved:-
   The final pic shows the red light better and the blurred Defiant better shows the difference between the glowing hulls and the unlit nacelles:-

Sunday, 30 March 2014

Star Trek: TOS:- remastered "The Enterprise Incident" Diorama - micro build log

   Moving onto the remastered version, I'm basically just lathering, rinsing and repeating with the new colour scheme to match the bird of prey.
   With the wing sections built on both D7s I cut all the tiny pieces:-
and fitted everything together:-
leaving the nacelles and command module to be built. I forgot that I had a fibre optic filament to thread through one of them so that should try my patience no end! The finished grey D7s look like this:-
  
Now onto the bird of prey:-

   Partially built it looked like this:-
   ​And with all three built and mounted we have "The Enterprise Incident" Mk II:-
   And finally, "The Enterprise Incident" II-A:-
   The surprise I was working on was my attempt at a cloaked D7, using battery packaging, a tiny piece of fibre optic filament and a trimmed dud LED:-
   I forgot the episodes of CSI that show how latent fingerprints are brought up with superglue fumes, hence the opacity, but all in all it's come out fairly well.